Mixing plaster, adding an aggregate, casting a block and carving it.
The following is written as a class lesson, but is also appropriate for an individual.
Ages 6 - adult.
2-4 sessions, more if painting.
Materials each participant needs:
|
Airborne plaster and Every user must wear an appropriate dust-mask and eye protection, or be very effective in preventing dust from polluting the workplace's atmosphere. |
Overview
Today you will mix plaster with water and vermiculite, cast it in a mold, and let it set. The next time we meet you will remove the mold, and then carve a sculpture from the block of plaster.
Casting the block
1. Measure and combine in the cup or carton:
2. Stir this with a stick to a smooth mixture.
3. Immediately place 3 scoops of vermiculite into the plaster. This aggregate will decrease the plaster's hardness, making it easier to carve.
4. Air bubbles in the block can be annoying later, so remove them by tapping the sides of the mold right away. If the mixture has been made quickly, for a short time it will be soft enough to permit air to rise to the top and escape. Any bubbles that appear on the surface of a carving, however, can be filled in with plaster.
5. Allow at least an hour for this block to firm up. The moisture in the plaster doesn't need to evaporate for the plaster to set, but the plaster gets progressively harder as it dries. The block will be easier to carve while it remains moist, so it's good to store works-in-progress in plastic bags. There is a certain brittleness to the plaster at every stage of its hardness. This will only be appreciated with experiences of breaking it. In order to make breakage more acceptible, prepare extra blocks for new bginnings, and keep some adhesives ("Elmer's Glue" is fine) handy for repairs.
6. Mark works-in-progress so that everyone can tell whose is whose at every stage of the work.
Clean up
Plaster can ruin sponges and clog drains, so wipe up with paper towels and put wasted plaster in the trash. Remember that no one should breath the dust, so rather than blowing or sweeping it, wipe it up with a damp towel. Scrapers should be at hand for removing plaster that hardened onto tables and floors.
Carving
The subject of a carving is often chosen in advance, and even sketched out on paper or with clay. Better for this first experience will be the direct carving of a free-form sculpture -- a nonobjective work that is discovered gradually as the carving progresses. Some examples could be seen in the works by Brancusi, Arp, Hepworth, and Moore. Think of the goal as a composition of hills and valleys, interesting to see from all points of view. Consider positive and negative spaces, and watch for interesting shadows as you turn your work in your hands. You might include one or more holes, as Hepworth and Moore often did. Perhaps what you carve will later serve as a model for a much larger work in plaster or stone or metal.
Although you may wish to give your work some delicacy or grace, avoid making any part so fragile that it could easily be broken. You would rather not have to start over with a new block or make repairs with glue, and whoever owns the piece later on would rather your work wasn't damaged.
Carving is an act of subtraction -- removing material. You might make some pencil marks on your block to begin the shaping of your block. Begin by "roughing-out" the essential form, while remembering that nothing removed can be returned to the form later. Work at arriving at this form before you complete the carving by refining the texture of the form's surface. The final form of your work might be finished entirely smoothly, or with one or several textures, and you might add one or more colors to it too.
It is easiest to do little carving. A timid beginner may seek comfort in doing the minimum, and declare a project completed while it remains in much the same form as it began. In order to encourage a more transformed result, announce that one goal is to remove 30-50% of the material from the block, and that its final form should bear little resemblance to its original one.
Finishing
Finishing the sculpture is best done when it is completely dry -- when it no longer feels cool to touch. Achieving the surface you want might require some rasps or files, some bits of wire screen or sandpaper, and some tools with fine points. You must also decide to either paint it or leave it unpainted. A surface of unpainted plaster must be sealed to keep dirt from building up in its pores. It could be sealed with wax, shellac or linseed oil.

![]() Constantin Brancusi (French, born Rumania,
1876-1957), Maiastra, 1911, polished
bronze and stone,
90.5 x 17.1 x 17.8 cm, Tate Gallery, London.
Constantin Brancusi (French, born Rumania,
1876-1957), Maiastra, 1911, polished
bronze and stone,
90.5 x 17.1 x 17.8 cm, Tate Gallery, London.
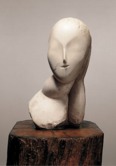
![]() Constantin Brancusi, The Muse, 1912, marble, 17 3/4 x 9 x 6 3/4 inches, Solomon
R. Guggenheim Museum, NY.
Constantin Brancusi, The Muse, 1912, marble, 17 3/4 x 9 x 6 3/4 inches, Solomon
R. Guggenheim Museum, NY.
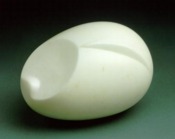
![]() Constantin Brancusi, The Newborn, 1915, marble, 8 1/2 x 6 inches, Philadelphia
Museum of Art.
Constantin Brancusi, The Newborn, 1915, marble, 8 1/2 x 6 inches, Philadelphia
Museum of Art.

![]() Jean [or Hans] Arp (French, 1887-1966), Head and Shell, c. 1933, polished
bronze, Guggenheim Museum, NY.
Jean [or Hans] Arp (French, 1887-1966), Head and Shell, c. 1933, polished
bronze, Guggenheim Museum, NY.
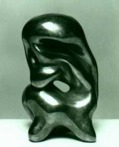
![]() Jean Arp, Configuration Angoissant, 1957, polished
bronze, height
12 cm.
Jean Arp, Configuration Angoissant, 1957, polished
bronze, height
12 cm.
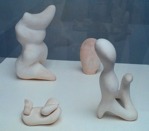
![]() Jean Arp, plaster sculptures in a vitrine at the Kroller-Muller
Museum, Otterlo, Netherlands.
Jean Arp, plaster sculptures in a vitrine at the Kroller-Muller
Museum, Otterlo, Netherlands.

![]() Henry Moore, OM, CH (English, 1898-1986),
Recumbent Figure, 1938, green Hornton
stone, 88.9 x 132.7 x 73.7 cm, weight
520 kg, Tate Gallery, London.
Henry Moore, OM, CH (English, 1898-1986),
Recumbent Figure, 1938, green Hornton
stone, 88.9 x 132.7 x 73.7 cm, weight
520 kg, Tate Gallery, London.

![]() Henry Moore, Reclining Figure, 1951, plaster and string,
105.4 x 227.3 x 89.2 cm, Tate Gallery, London. See figure.
Henry Moore, Reclining Figure, 1951, plaster and string,
105.4 x 227.3 x 89.2 cm, Tate Gallery, London. See figure.
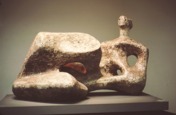
![]() Henry Moore, Working Model for Reclining Figure, 1957,
plaster, United Nations, NY.
Henry Moore, Working Model for Reclining Figure, 1957,
plaster, United Nations, NY.

![]() Dame Barbara Hepworth (English, 1903-1975),
Oval Sculpture (No. 2), 1943, cast
1958, plaster, 29.3 x 40.0 x 25.5 cm, Tate Gallery, London. See
oval.
Dame Barbara Hepworth (English, 1903-1975),
Oval Sculpture (No. 2), 1943, cast
1958, plaster, 29.3 x 40.0 x 25.5 cm, Tate Gallery, London. See
oval.
Other plaster projects
https://inform.quest/_art
 all other dusts are hazardous
to
all other dusts are hazardous
to breathe.